


Essential Angular Signals Cheatsheet: Boost Your Daily Productivity
This is a full guide about Angular Signals. You can check it everytime you need something about Signals. Take it as your daily check list because soon or later your company will tell you to migrate.

Interfaces / Types
1. Signal (readonly)
Every reactive value on Angular at the end will extend or it’s of this type (Signal).
/**
 * A reactive value which notifies consumers of any changes.
 *
 * Signals are functions which returns their current value. To access the current value of a signal,
 * call it.
 *
 * Ordinary values can be turned into `Signal`s with the `signal` function.
 */
export type Signal<T> = (() => T) & {
  [SIGNAL]: unknown;
};
(() => T): this part says that a Signal is a function that takes no arguments and returns a value of type T. This is how you get the current value from a Signal.
💡 Do you know why Angular uses a Symbol on the Signal<T> type?
Because it will be easier and unique to identify reactive values.
// (Simplified representation, not actual Angular code)

const SIGNAL = Symbol('SIGNAL'); // Create the symbol

function createSignal<T>(initialValue: T): Signal<T> {
    const signal = () => initialValue; // Function to get the value

    // Add the SIGNAL property
    Object.defineProperty(signal, SIGNAL, { value: true, enumerable: false });

    return signal as Signal<T>; // Return the Signal object
}

function effect(fn: () => void) {
    // ... (implementation of effect to track dependencies)
    // ... (inside the effect, when accessing a Signal)
    if (signal && signal.hasOwnProperty(SIGNAL)) {
        // It's a Signal! Track it for dependency updates.
        // ...
    }
}
So, every time you create a signal it will be of this type: Signal<T>. And here is how we can create a signal:
// Signal<number>
// without asReadonly() it would be a WritableSignal<number>
now = signal(Date.now()).asReadonly();
2. WritableSignal
A signal with a value that can be mutated with set() or update(). We can make it also readonly with asReadonly().
/**
 * A `Signal` with a value that can be mutated via a setter interface.
 */
export interface WritableSignal<T> extends Signal<T> {
  [ɵWRITABLE_SIGNAL]: T;

  /**
   * Directly set the signal to a new value, and notify any dependents.
   */
  set(value: T): void;

  /**
   * Update the value of the signal based on its current value, and
   * notify any dependents.
   */
  update(updateFn: (value: T) => T): void;

  /**
   * Returns a readonly version of this signal. Readonly signals can be accessed to read their value
   * but can't be changed using set or update methods. The readonly signals do _not_ have
   * any built-in mechanism that would prevent deep-mutation of their value.
   */
  asReadonly(): Signal<T>;
}
I use a lot the asReadonly() feature in my Signal Stores. I explain this store in this two videos I made in my YouTube channel:
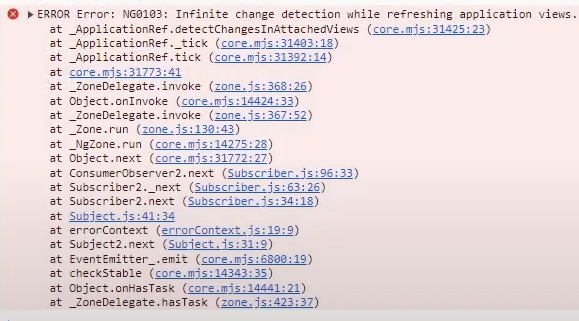
NG0103: Infinite change detection while refreshing application views
export class AppComponent {
  count = signal(5);

  constructor() {
    afterRender(() => {
      // Don't use update ❌
      this.count.update(x => x + 1);

      // Use set ✔️
      this.count.set(x => x + 1);
    })
  }
}
Be very careful with using update() within the afterRender() hook as we would enter an infinite loop of recalculations. For this it is better to use set().
3. ReactiveNode
The ReactiveNode interface serves as the foundational type for all nodes within a reactive graph system, where nodes can act as either producers or consumers of reactive data.
Each node in the reactive graph implements the ReactiveNode interface.
Nodes can function as:
Producers (sources of reactive data)
Consumers (entities that react to data changes)
The interface enables the graph to:
Track node versions to detect changes
Determine when updates are necessary
Manage dependencies between nodes
Orchestrate the propagation of updates
export const REACTIVE_NODE: ReactiveNode = {
  version: 0 as Version,
  lastCleanEpoch: 0 as Version,
  dirty: false,
  producerNode: undefined,
  producerLastReadVersion: undefined,
  producerIndexOfThis: undefined,
  nextProducerIndex: 0,
  liveConsumerNode: undefined,
  liveConsumerIndexOfThis: undefined,
  consumerAllowSignalWrites: false,
  consumerIsAlwaysLive: false,
  producerMustRecompute: () => false,
  producerRecomputeValue: () => {},
  consumerMarkedDirty: () => {},
  consumerOnSignalRead: () => {},
};
4. ResourceRef
This is the interface that the resource() API uses. As you can see in the code, at the end it becomes a WritableSignal.
/**
 * A `WritableResource` created through the `resource` function.
 *
 * @experimental
 */
export interface ResourceRef<T> extends WritableResource<T> {
  /**
   * Manually destroy the resource, which cancels pending requests and returns it to `idle` state.
   */
  destroy(): void;
}

/**
 * A `Resource` with a mutable value.
 *
 * Overwriting the value of a resource sets it to the 'local' state.
 *
 * @experimental
 */
export interface WritableResource<T> extends Resource<T> {
  readonly value: WritableSignal<T | undefined>;
  hasValue(): this is WritableResource<T> & {value: WritableSignal<T>};

  /**
   * Convenience wrapper for `value.set`.
   */
  set(value: T | undefined): void;

  /**
   * Convenience wrapper for `value.update`.
   */
  update(updater: (value: T | undefined) => T | undefined): void;
  asReadonly(): Resource<T>;
}
Reactivity System in Angular
Angular signals were released on version 16 and some of them become stable on version 17 (effect() is still in developer preview).
1. Create Readonly Signals
You can specify that some argument from some function expect a Signal type, make it readonly with the asReadonly() or creating a computed() signal:
search = signal(''); // WritableSignal<string>
search2 = this.search.asReadonly(); // Signal<string>

// Signal<string>
uppercaseSearchTerm = computed(() => this.search().toUpperCase());

getSomething(expect: Signal<string>): void {
  // arg is of type readonly signal
}
2. Create Writable Signals
Just by using the signal() function from the core package:
search = signal(''); // WritableSignal<string>3. Read Signals
You just have to invoke them because at the end they are just wrappers of values such as functions:
// app.component.ts
search = signal('');
searchText = `Search: ${search()}`

// app.component.html
<p>search()</p>
4. Computed
Computed allows us to listen to Signals and when they change do recomputations. Computed signals are readonly.
/**
 * Create a computed `Signal` which derives a reactive value from an expression.
 */
export function computed<T>(computation: () => T, options?: CreateComputedOptions<T>): Signal<T> {
  performanceMarkFeature('NgSignals');
  const getter = createComputed(computation);
  if (options?.equal) {
    getter[SIGNAL].equal = options.equal;
  }

  if (ngDevMode) {
    getter.toString = () => `[Computed: ${getter()}]`;
    getter[SIGNAL].debugName = options?.debugName;
  }

  return getter;
}
A basic example would be:
export class AppComponent {
  counter = signal(0); // 🔢 Initial counter value

  // 🧮 Computed value that depends on counter
  incrementCounterWith2 = computed(() => this.counter() + 2);

  constructor() {
    // 📊 Demonstrating reactivity of computed values
    console.log('📈 Counter incremented:', this.incrementCounterWith2()); // 2
    this.counter.set(2);
    console.log('📈 Counter incremented:', this.incrementCounterWith2()); // 4
  }
}
Here we can see that incrementCOunterWith2 dependes on the first signal (counter) and when counter changes, it recalculates incrementCOunterWith2.
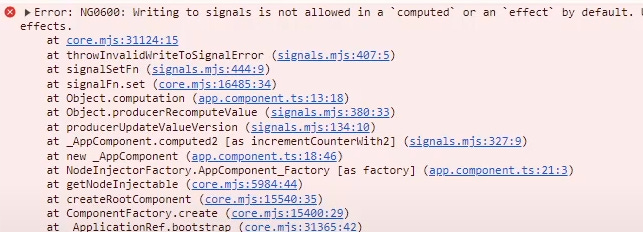
NG0600: Writting to signals is not allowed in a `computed` or an `effect`by default.
export class AppComponent {
  counter = signal(0);

  // 🚫 Problematic computed value
  incrementCounterWith2 = computed(() => {
    this.counter.set(5);  // 🛑 Error: NG0600
    return this.counter() + 2;
  });
}
If we take a look into the above code we can’t set signal new values inside computed() or we will get the following error:
Computed() optional parameter: equal()
You can choose when to recalculate your signal in this way:
incrementCounterWith2 = computed(() => this.counter() + 2, {
  equal: (a, b) => a === b
});
It means that if a === a it wont be recalculated.
WeakRef deprecated in favour of StrongRef
Imagine we have the following code:
let a = computed(() => {
  let b = computed(() => this.counter());
  return true;
});
a with b have a StrongRef but counter() with a has a WeakRef and this is a problem with the Garbage Collector because sometimes a won’t be recalculated. The Angular team fixed this here.
5. Effects (@developerPreview)
With signals we can have hooks to be listening to our signals by just using the Effect API.
/**
 * Registers an "effect" that will be scheduled & executed whenever the signals that it reads
 * changes.
 *
 * Angular has two different kinds of effect: component effects and root effects. Component effects
 * are created when `effect()` is called from a component, directive, or within a service of a
 * component/directive. Root effects are created when `effect()` is called from outside the
 * component tree, such as in a root service, or when the `forceRoot` option is provided.
 *
 * The two effect types differ in their timing. Component effects run as a component lifecycle
 * event during Angular's synchronization (change detection) process, and can safely read input
 * signals or create/destroy views that depend on component state. Root effects run as microtasks
 * and have no connection to the component tree or change detection.
 *
 * `effect()` must be run in injection context, unless the `injector` option is manually specified.
 *
 * @developerPreview
 */
export function effect(
  effectFn: (onCleanup: EffectCleanupRegisterFn) => void,
  options?: CreateEffectOptions,
): EffectRef {
  if (useMicrotaskEffectsByDefault) {
    if (ngDevMode && options?.forceRoot) {
      throw new Error(`Cannot use 'forceRoot' option with microtask effects on`);
    }

    return microtaskEffect(effectFn, options);
  }

  performanceMarkFeature('NgSignals');
  ngDevMode &&
    assertNotInReactiveContext(
      effect,
      'Call `effect` outside of a reactive context. For example, schedule the ' +
        'effect inside the component constructor.',
    );

  !options?.injector && assertInInjectionContext(effect);

  if (ngDevMode && options?.allowSignalWrites !== undefined) {
    console.warn(
      `The 'allowSignalWrites' flag is deprecated & longer required for effect() (writes are allowed by default)`,
    );
  }

  const injector = options?.injector ?? inject(Injector);
  let destroyRef = options?.manualCleanup !== true ? injector.get(DestroyRef) : null;

  let node: EffectNode;

  const viewContext = injector.get(ViewContext, null, {optional: true});
  const notifier = injector.get(ChangeDetectionScheduler);
  if (viewContext !== null && !options?.forceRoot) {
    // This effect was created in the context of a view, and will be associated with the view.
    node = createViewEffect(viewContext.view, notifier, effectFn);
    if (destroyRef instanceof NodeInjectorDestroyRef && destroyRef._lView === viewContext.view) {
      // The effect is being created in the same view as the `DestroyRef` references, so it will be
      // automatically destroyed without the need for an explicit `DestroyRef` registration.
      destroyRef = null;
    }
  } else {
    // This effect was created outside the context of a view, and will be scheduled independently.
    node = createRootEffect(effectFn, injector.get(EffectScheduler), notifier);
  }
  node.injector = injector;

  if (destroyRef !== null) {
    // If we need to register for cleanup, do that here.
    node.onDestroyFn = destroyRef.onDestroy(() => node.destroy());
  }

  if (ngDevMode) {
    node.debugName = options?.debugName ?? '';
  }

  return new EffectRefImpl(node);
}
We must define them in an injection context or using the runInInjectionContext() function:
ngOnInit(): void {
  this.runInInjectionContext(this.injector, () => {
    effect(() => {
      console.log('Effect works inside ngOnInit()');
    });
  });
}
Prevent Error: NG0600 error seen in computed()
🔴 This will be removed in Angular 19 (allowSignalWrites)!
👀 If you are in a previous version before this comes out you can solve it with the below code.
We can use it’s optional parameter allowSignalWrites:
export class AppComponent implements OnInit {
  example = signal(2);
  data = input.required<number[]>();

  injector = inject(Injector);

  ngOnInit(): void {
    runInInjectionContext(this.injector, () => {
      effect(() => {
        console.log('Hijo', this.example() + this.data().length);
        this.example.set(5); // Works
      }, {
        allowSignalWrites: true
      });
    });
  }
}
With this parameter we will be able to write signals inside effect. Note that this is not posible inside computed(). But be careffuly with this and what are you writting to, to avoid infinite loops.
Effect manualCleanup
You can use this optional parameter in effect to manually clean it.
fieldInitializerEffect = effect(
  () => console.log('Field initializer', this.todoList()),
  { manualCleanup: true }
);
And then you can do:
this.fieldInitializerEffect.destroy();Another way to destroy/clean the effect is with the buildIn method onCleanup:
constructor() {
  effect(onCleanup => {
    console.log('Constructor', this.todoList());

    // imagine we have this:
    // sub... a = Subcription

    onCleanup(() => {
      // a.unsubscribe();
    });
  });
}
And all the options we can pass to the effect are those:
injector?: InjectormanualCleanup?: booleanallowSignalWrites?: boolean: will be removedforceRoot?: booleandebugName?: string
/**
 * Options passed to the `effect` function.
 *
 * @developerPreview
 */
export interface CreateEffectOptions {
  /**
   * The `Injector` in which to create the effect.
   *
   * If this is not provided, the current [injection context](guide/di/dependency-injection-context)
   * will be used instead (via `inject`).
   */
  injector?: Injector;

  /**
   * Whether the `effect` should require manual cleanup.
   *
   * If this is `false` (the default) the effect will automatically register itself to be cleaned up
   * with the current `DestroyRef`.
   */
  manualCleanup?: boolean;

  /**
   * Always create a root effect (which is scheduled as a microtask) regardless of whether `effect`
   * is called within a component.
   */
  forceRoot?: true;

  /**
   * @deprecated no longer required, signal writes are allowed by default.
   */
  allowSignalWrites?: boolean;

  /**
   * A debug name for the effect. Used in Angular DevTools to identify the effect.
   */
  debugName?: string;
}
If you want to learn more about why allowSignalWrites got removed, just read my post about effects where I explain it in depth.
The last property, debugName, is a newly introduced one in Angular 19 to have a debugging system about how our Graph is built. To learn more, read my post about debugging the Signal Graph.
What about a root effect? Do you know what it means? Read more about root vs view effects here.
6. Untracked
It’s very helpful when we do not want to listen on some signal changes:
export class AppComponent {
  counter1 = signal(1);
  counter2 = signal(2);
  suma = computed(() => this.counter1() + this.counter2());

  constructor() {
    effect(() => {
      console.log(
        `Sum: ${this.counter1() + untracked(() => this.counter2())}`
      );
    });
  }
}
In this example, our effect won’t run if counter2() change, just when counter1() does.
7. AfterRenderEffect - @experimental
This new reactive primitive creates effect(s) that run as part of Angular's afterRender sequence.
afterRenderEffect is a function that registers an effect to be executed after the application has finished rendering. It's particularly useful for scenarios where you need to read from or write to the DOM, as it ensures that these operations happen at the right time in the rendering lifecycle.
import { Component, afterRenderEffect } from '@angular/core';

@Component({
  selector: 'app-example',
  template: '<div #myElement>Hello, World!</div>',
  standalone: true
})
export class ExampleComponent {
  constructor() {
    /**
     * According to the docs:
     * You should prefer specifying an explicit phase for the effect instead,
     * or you risk significant performance degradation.
     */
    afterRenderEffect(() => {
      console.log('This runs after the component has rendered');
    });
  }
}
If you want to learn more, you can read my post about afterRenderEffect.
8. LinkedSignal - @experimental
A linkedSignal represents state that is reset based on a provided computation. Conceptually, it maintains state that is only valid within the context of another source signal. This makes it perfect for scenarios where one piece of state depends on another.
const counter = signal(0);
const doubledCounter = linkedSignal(() => counter() * 2);
If you want to learn more, you have my post about LinkedSignal.
9. Resource API - @experimental
Angular 19 introduces a powerful new reactive primitive called resource() that helps manage asynchronous dependencies through the signal system. Resources are particularly useful for handling API call.
readonly getCatsFacts = resource({
  loader: async () => {
    try {
      const response = await (await fetch(`${this._apiUrl}/?count=10`)).json() as { data: string[] };
      return response.data;
    } catch(error) {
      throw error;
    }
  }
});
If you want to learn more, you have my post about the new Resource API.
Authoring
1. Signal Based Inputs (17.1)
We can convert our traditional inputs (@Input()) with signals:
export class AppComponent {
  books = input<Book[], Book[]>([], {
    alias: '',
    transform: (data: Book[]) => data
  });
}
As you can see if we use our input() with transform, our first generic is what we receive on our input and the second one is what we return from our transform function.
Here are a list of the input() options that can receive:
alias?: stringtransform?: (v: TransformT) => T
/**
 * @publicAPI
 *
 * Options for signal inputs.
 */
export interface InputOptions<T, TransformT> {
  /** Optional public name for the input. By default, the class field name is used. */
  alias?: string;
  /**
   * Optional transform that runs whenever a new value is bound. Can be used to
   * transform the input value before the input is updated.
   *
   * The transform function can widen the type of the input. For example, consider
   * an input for `disabled`. In practice, as the component author, you want to only
   * deal with a boolean, but users may want to bind a string if they just use the
   * attribute form to bind to the input via `<my-dir input>`. A transform can then
   * handle such string values and convert them to `boolean`. See: {@link booleanAttribute}.
   */
  transform?: (v: TransformT) => T;

  /**
   * A debug name for the input signal. Used in Angular DevTools to identify the signal.
   */
  debugName?: string;
}
You can also make them required:
books = input.required<Book[], Book[]>([]);2. Two-way data binding with Model Input (17.2)
@Input() / @Output()
Angular uses the @Input() and @Output() decorators along with event binding to achieve two-way data binding between parent and child components. This is often referred to as the "banana in a box" syntax.
@Component({
  selector: 'app-parent',
  standalone: true,
  imports: [ChildComponent],
  template: `
    <app-child [(value)]="parentValue" />
    <p>Parent value: {{ parentValue }}</p>
  `
})
export class ParentComponent {
  parentValue = '';
}

@Component({
  selector: 'app-child',
  standalone: true,
  template: `
    <input [value]="value" (input)="onInputChange($event)" />
  `
})
export class ChildComponent {
  @Input() value = '';
  @Output() valueChange = new EventEmitter<string>();

  onInputChange(event: Event) {
    const newValue = (event.target as HTMLInputElement).value;
    this.valueChange.emit(newValue);
  }
}
ngModel
NgModel is another way to implement two-way data binding in Angular, often used with template-driven forms. It's a simpler syntax compared to the Input/Output method, but it's important to note that NgModel is specific to form controls.
<input [(ngModel)]="value" (ngModelChange)="valueChange.emit($event)" />New Model Input
Angular 17.2 introduced a new way to handle two-way data binding using the model() function. This approach simplifies the process and provides a more integrated solution within Angular's reactivity system.
@Component({
  selector: 'app-parent',
  standalone: true,
  imports: [FormsModule, ChildComponent],
  template: `
    <h2>Parent Component</h2>
    <input [(ngModel)]="parentValue">
    <p>Parent value: {{ parentValue }}</p>
    <app-child [(value)]="parentValue"></app-child>
  `
})
export class ParentComponent {
  parentValue = 'Initial value';
}

@Component({
  selector: 'app-child',
  standalone: true,
  imports: [FormsModule],
  template: `
    <h3>Child Component</h3>
    <input [ngModel]="value()" (ngModelChange)="value.set($event)">
    <p>Child value: {{ value() }}</p>
  `
})
export class ChildComponent {
  value = model('');
}
Under the hood it uses the OutputEmitterRef class. Also, you can play with this new function using set(), update() or subscribe():
// app.component.ts
data = model();
data.subscribe();
data.set();
data.update();
You can also use different syntax in the template:
<app [(data)] />
<app [data] />
<app (dataChange) />
The only one available optional parameter is to pass an alias:
// optional
data = model<Data>({ alias: 'currentData' });

// required
data = model.required<Data>({ alias: 'currentData' });

// then when you use it:
<app [currentData]="data" />
3. Signal Queries (17.2)
They are an incredible improvement over the loading of views. Why? Because we no longer have to use a component lifecycle like afterViewInit or afterContentInit to wait for our query to resolve. With the signals you do it on the fly.
So, instead of using the decorator based query, use the signal one:
@ViewChild() → viewChild()
@ViewChildren → viewChildren()
@ContentChild → contentChild()
@ContentChildren → contentChildren()
4. Output API (17.3)
The new output API (17.3) eliminates the need to use RxJS and does it manually relying on OutputEmitterRef and OutputRef. In addition, it does the unsubscribe cleanup for us.
@Directive({
  // ...
})
export class MyDir {
  nameChange = output<string>();
  onClick = output();
}
Use the emit() method on the OutputEmitterRef to send values:
updateName(newName: string): void {
  this.nameChange.emit(newName);
}
And in templates you can use it this way:
<my-component (nameChange)="handleNameChange($event)" />Parent components can subscribe to the output using OutputRef#subscribe.
You can also pass an optional option to it (alias):
alias = output<Data>({ alias: 'aliasEvent' });

// then when you use it
<component (aliasEvent)="handleData($event)" />
@angular/core/rxjs-interop package
The Angular team has created some features in this package to make RxJS and Signals coexistence pleasant.
1. toSignal() - @developerPreview
I used this one so much when I have a request that returns an Observable and I want it to be a signal:
// favourites.service.ts
private _favouritesSubject$ = new BehaviorSubject<Photo[]>([]);
getFavourites(): Observable<Photo[]> {
  return this._favouritesSubject$.asObservable();
}

// favourites.component.ts
favourites = toSignal(
  this._favouritesService.getFavourites()
);
2. toObservable() - @developerPreview
It’s useful when for example you want to get an Observable from a Signal. Look at example:
// search.component.html
search = signal('');
searchTerm = outputFromObservable(
  toObservable(this.search).pipe(
    debounceTime(500),
    distinctUntilChanged()
  )
);
Here I use toObservable() because I need to generate an output() and this output() needs an Observable. Look at this superpower!
3. outputFromObservable()
When you want to generate an output() from an Observable. Check the previous example.
4. outputToObservable()
When you want to generate an Observable from an output(). Imagine you receive some value from you child component and you want to convert it to Observable to be able to use some async pipe or to pass to something that expects an Observable.
// app.component.ts
data = output();
handleData(): void {
  const data$ = outputToObservable(this.data);

  // do whatever you want with this data$ (Observable)
  // ...
}
5. takeUntilDestroyed()
Helps us to complete our Observable when the context we provide is destroyed. The context can be a componente, directive, service, etc.
@Component({...})
export class MyComp {
  private readonly _destroy = inject(DestroyRef);

  constructor() {
    // This will be completed when the component is destroyed
    interval(1000).pipe(takeUntilDestroyed(this._destroy)).subscribe();
  }
}
6. pendingUntilEvent() - @experimental
Operator which makes the application unstable until the observable emits, complets, errors, or is unsubscribed.
Use this operator in observables whose subscriptions are important for rendering and should be included in SSR serialization.
Note that it’s experimental.
// This should not block stability until subscription
const originalSource = new BehaviorSubject(0);
const delayedSource = originalSource.pipe(
  delay(5),
  pendingUntilEvent(injector)
);
7. rxResource() - @experimental
rxResource() is a flavor of resource() which uses a projection to an Observable as its loader (like switchMap). So you can use Observables in your request. Therefore, the loader function will return an Observable instead of a Promise. Let’s see it in action by refactoring our service.
For examples check this rxResource() example.
Assertions
A reactive context in Angular is an execution environment where the framework is actively tracking dependencies and setting up subscriptions for reactive primitives like signals or observables.
For example, we are in a reactive context when are are inside the body of effect() or computed(), etc.
So, when we declare our toSignal(), effect() or the afterRender() hook we must ensure that we are outside this reactive context. Why? To be able to infinite loops or unexpected behavior. For that we have this assertion:
export function assertNotInReactiveContext(
  debugFn: Function,
  extraContext?: string
): void {
  if (getActiveConsumer() !== null) {
    throw new RuntimeError(
      RuntimeErrorCode.ASSERTION_NOT_INSIDE_REACTIVE_CONTEXT,
      ngDevMode &&
        `${debugFn.name}() cannot be called from within a reactive context.${
          extraContext ? ` ${extraContext}` : ''
        }`,
    );
  }
}
Graph - Consumers Producers
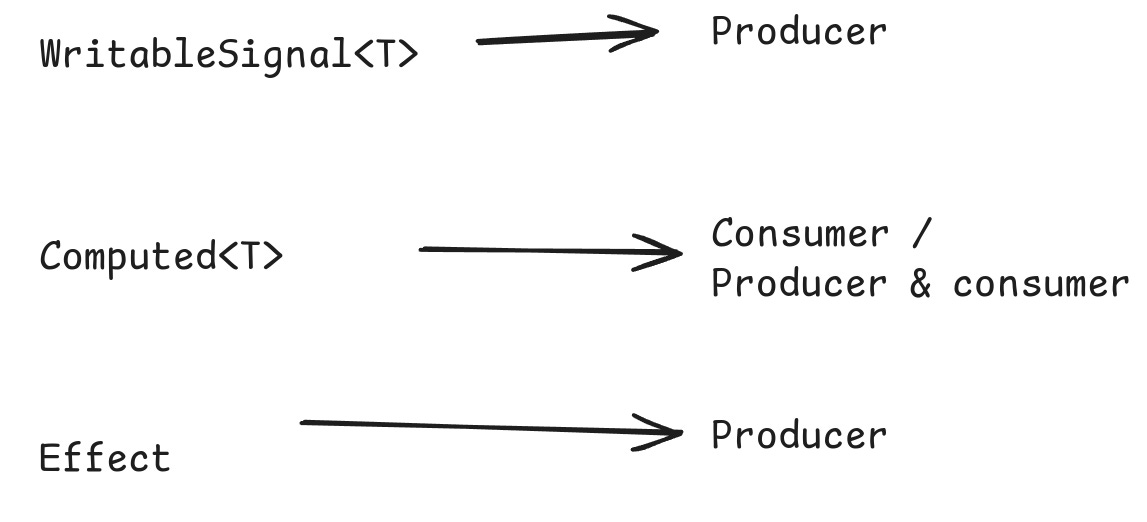
Every signal, every node that fills the graph of reactivity in Angular is a producer or a consumer or both.
Producer: we produce new values (when you create a signal or update it’s value).
Consumer: you consume the value produced.
Mixed: this happens with
computed, but why? Because you wait for it (consume) and then you do another calculation (producer).
Signal Debugging Features
Angular 19 introduces significant improvements to signal debugging capabilities. These improvements are primarily focused on enhancing the Angular DevTools experience.
We will have debug names for signals (debugName) and a signal graph API (getSignalGraph).
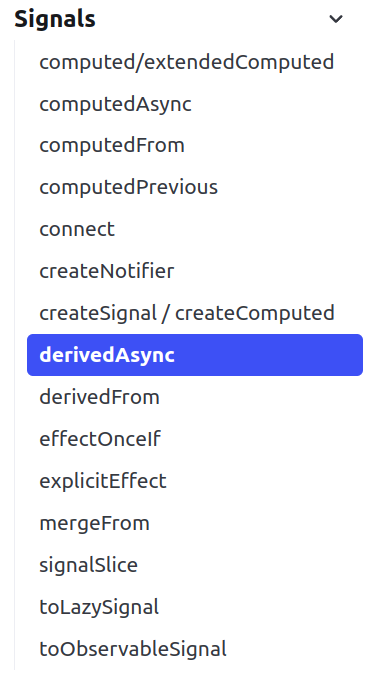
Signal utilities - ngxtensions
You have a detailed list of utilities you can use from ngxtensions. I will focus on derivedAsync because is the one that I most use:
With derivedAsync you can react to a signal value and then perform something. Let me put the examples that is on the documentation of this utility:
export class MovieCard {
  movieId = input.required<string>();

  movie = derivedAsync(() =>
    fetch(`https://localhost/api/movies/${this.movieId()}`).then((r) =>
      r.json(),
    ),
  );
}
Look at the power of this, if the input changes, the previous request will be canceled and the movie signal willl be recalculated. You can find more details on the documentation.
Summary
The reactivity system in Angular is very rich and I made this cheatsheet about signals to clarify the graph.

Thanks for reading so far 🙏
I’d like to have your feedback so please leave a comment, clap or follow. 👏
Spread the Angular love! 💜
If you really liked it, share it among your community, tech bros and whoever you want! 🚀👥
Don't forget to follow me and stay updated: 📱
Thanks for being part of this Angular journey! 👋😁